
After learning of Teds broken chine when attempting the bend, I decided to laminate the chines to make for easy bending. So I cut my chine material to rough length, about 12, and then ripped them to 3/8" thick. The cutoff pieces were about 1/4+" thick. I then soaked all four pieces in the 4" soaking pipe, stem end first, for a couple of days to noodle them up a bit.
I borrowed the soaking pipe from Ted. By hanging it in the stairwell, it can be loaded with long pieces of wood, filled with water and not get in anybodys way. Also, its a lot easier to keep the water in it if its not horizontal.
After soaking, the chine material was put on the boat and bent into place. The two layers of thin material bent easily into position on the frames and up against the stem. They were left to dry for a couple of days while I did other things like work for a living.

When it came time to figure out how to fit the chines at the stem, I decided that without having the shears in place, it was hard to judge how much twist to put into them. I decided that procrastination was a good approach to the question, and bending and installing the shears first might answer the question or provide enough time to figure it out.
The picture shows the chines held in place and the one layer of the shears bent and clamped in place. On the left is a previously bent shear just resting in place waiting for the glue-up to take place.

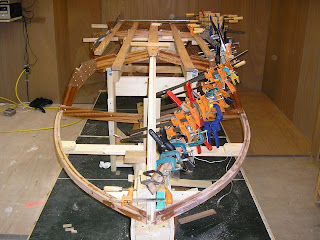

 After completing the lamination on both chines, the epoxy squeeze out was planed off with a hand plane. I found this easiest to do in my shop with the chine in a vice and moved it along in the vice as I progressed. Then the chines were fit to the boat, epoxied and screwed into place. After all the consternation about the fit to the stem, the chine ended up looking too straight in the forward area and without enough twist so it did not angle nicely toward the shear. I ended up making a long tapered section piece about 3/8" thick at the bottom and 1/8" at the top and laminated it onto the chine from stem to about 8" forward of the frame. Using the small belt sander, it was blended into the chine.


